Prompt Library Manager: User Guide
Author: Manus AI
1. Introduction
Welcome to the Prompt Library Manager! This guide provides a comprehensive overview of how to use the plugin to create, organize, test, and optimize your AI prompts directly within your WordPress dashboard. By centralizing your prompt engineering efforts, you can scale your content creation, improve marketing ROI, and build a valuable, reusable asset for your business.
This document will walk you through installation, setup, core features, and pro-level functionalities to help you get the most out of the plugin.
2. Getting Started: Installation & Setup
This section covers the initial steps to get the plugin up and running, activate your professional license, and connect to your favorite AI providers.
2.1. Plugin Installation
Installing the Prompt Library Manager follows the standard WordPress procedure:
- From your WordPress dashboard, navigate to Plugins > Add New.
- Click the Upload Plugin button at the top of the page.
- Choose the prompt-library-manager.zip file from your computer.
- Click Install Now and then Activate Plugin.
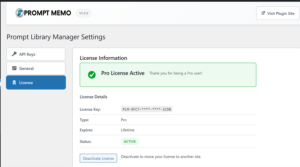
2.2. Activating Your Pro License
Activating your Pro license unlocks all professional features, including access to all supported AI providers and unlimited prompt creation.
- After activating the plugin, navigate to Prompts >Settings> License from the left-hand menu.
- Enter your license key into the designated field.
- Click Activate License.
Upon successful activation, you will see a confirmation message indicating that your Pro license is active, as shown below.
2.3. Adding API Keys
To test prompts, you must add your API keys from the AI providers you wish to use. The plugin stores your keys securely using AES-256-GCM encryption.
- Navigate to Prompt Library Manager > Settings > API Keys.
- Select a provider from the dropdown menu (e.g., OpenAI, Anthropic).
- Enter your API key for that provider.
- Click Save Key. Repeat this process for all the providers you intend to use.
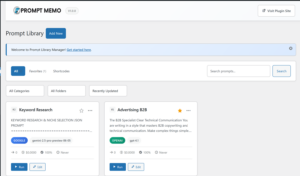
3. Core Feature: The Prompt Library
The heart of the plugin is the Prompt Library, a central dashboard to manage all your prompts.
3.1. Creating Your First Prompt
- Navigate to Prompts.
- Click the Add New
- This will open the Prompt Editor, where you can define every aspect of your prompt.
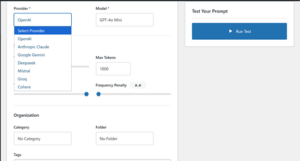
3.2. The Prompt Editor
The editor allows for detailed configuration of your prompts.
| Field | Description |
| Title | A descriptive name for your prompt (e.g., “SEO Blog Post Outline”). |
| Content | The main body of your prompt, including instructions and context. |
| Provider | Select the AI provider to use for this prompt (e.g., OpenAI, Google Gemini). |
| Model | Choose the specific model for the selected provider (e.g., GPT-4.1-Mini, Claude 3 Sonnet). |
| Temperature | Controls randomness. Lower values (e.g., 0.2) are more deterministic; higher values (e.g., 0.8) are more creative. |
| Max Tokens | The maximum number of tokens (words/characters) the AI can generate in its response. |
3.3. Smart Organization
Keeping your prompts organized is crucial as your library grows.
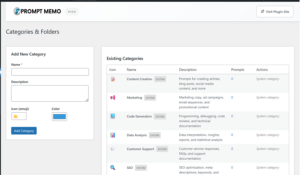
- Categories: Broad groupings for your prompts (e.g., “Marketing,” “Content Creation”). You can create and manage these from the Categories
- Folders: Sub-groupings within categories for more granular organization (e.g., “Email Marketing,” “Social Media Posts”).
- Tags: Flexible, searchable keywords that can be added to any prompt for quick filtering.
- Favorites: Mark your most-used prompts as favorites for one-click access from the main library view.
4. Testing & Optimization
Testing prompts is essential to ensure you are getting the best possible results from your chosen AI models.
4.1. Running a Test
From the Prompt Editor, you can instantly test your configuration:
- Fill in the prompt content and select your desired provider, model, and settings.
- Click the Run Test
- The AI’s response will appear, allowing you to evaluate its quality and effectiveness.
4.2. Saving Test Responses
The plugin automatically logs every test you run. This “Save Responses” feature is crucial for optimization. Each saved test includes:
- The AI-generated output.
- Performance metrics like response time.
- Cost estimates for the API call.
- The exact settings used for the test.
This history allows you to compare results across different models and settings, helping you identify the most effective and cost-efficient configurations for each task.
5. Managing Your Prompts
The Prompt Library dashboard provides several tools for efficient prompt management.
- Duplicate: Quickly create a copy of an existing prompt to use as a template for a new one. This is ideal for A/B testing minor variations.
- Edit: Modify an existing prompt’s content, settings, or organization.
- Archive: Remove prompts from the main library view without permanently deleting them.
6. Analytics & Data Management
Understanding your prompt performance is key to a successful strategy.
6.1. Analytics Dashboard
Navigate to the Analytics tab to view performance data, such as prompt usage, average costs, and response times. This helps you identify your most valuable and efficient prompts.
6.2. Exporting Your Data
The plugin allows you to export your data for backup or external analysis.
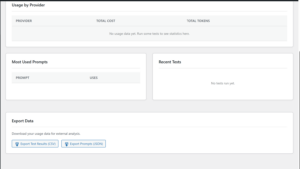
- Export Prompts (JSON): Creates a full backup of all your prompts.
- Export Tests (CSV): Downloads a spreadsheet of your test history.
7. Frequently Asked Questions (FAQ)
- Q: How do I change my profile picture in the WordPress dashboard?
- A: WordPress uses a free service called Gravatar to manage profile images. You can create an account at Gravatar.com using the same email address as your WordPress user, and your photo will appear automatically. This is purely cosmetic and does not affect plugin functionality.
- Q: Where is the Import feature?
- A: The current version of the plugin includes a robust export feature for backing up your prompts. An import function is planned for a future release to allow for easy restoration and sharing of prompt libraries.
- Q: Where is the multi-provider comparison feature?
- A: The backend logic for comparing a single prompt across multiple providers simultaneously is included in the code. However, a user interface to access this feature is still in development and will be available in a future update.